Materials:
- Yarn (any weight you want.. the thinner the yarn the smaller the bear and vice versa)
- Crochet hook (appropriate for the yarn you choose)
- Tapestry needle
- Craft/dolls eyes or buttons will do
- Stuffing
- Row/st marker
I have tested this pattern, but that doesn’t mean there are no mistakes. If you find any or have any questions, please feel free to contact me.
BODY:
1) ch 2, 8 sc in 2nd ch from hook (8)
2) 2 sc in each st around (16)
3) *sc in next st, 2 sc in next st* repeat around (24)
4) *sc in next 2 sts, 2 sc in next st* repeat around (31)
5) sc in easch st around
6) *sc in next 3 sts, 2 sc in next st* repeat around (39)
7) sc in each st around
8 ) *sc in next 4 sts, 2 sc in next st* repeat around (48)
9-17) sc in each st around
18) *sc in next 4 sts, sc2tog* repeat around (39)
19-20) sc in each st around
21) *sc in next 3 sts, sc2tog* repeat around (32)
22) *sc in next 2 sts, sc2tog* repeat around (24)
23) sc in each st around
24) *sc in next 2 sts, sc2tog* repeat around (18)
25) *sc in next st, sc2tog* repeat around (12) Stuff
26) sc2tog around. End off leaving a long tail sew hole closed.
LEGS: make 2
1) ch 7. sc in next 2 sts, hdc in next 2 sts, 2 dc in next st, 3 dc in next st, 2 dc in next st, hdc in next 2 sts, sc in next st, 2 sc in next st (16) This will form an oval for the bottom of foot.
2) 2 sc in next st, sc in next 2 sts, hdc in next 2 sts, dc in next st, 2 dc in next 3 sts, dc in next st, hdc in next 2 sts, sc in next 3 sts, 2 sc in next st (21)
3-4) sc in each st around
5) sc in next 11 sts, sc2tog, sc2tog, sc in next 6 sts (19)
6) sc in next 10 sts, sc2tog, sc2rog, sc in next 5 sts (17)
7) sc in next 10 sts, sc2tog, sc in next 5 sts (16)
8-13) sc in each st around
14) 2 sc in next st, sc in next 9 sts, 2 sc in next 6 sts (23)
15-19) sc in each st around
20) sc2tog, sc in next 14 sts, sc2tog, sc in next st, sc2tog, sc in next 2 sts (20)
21) *sc in next 3 sts, sc2tog* repeat around (16)
22) *sc in next2 sts, sc2tog* repeat around (12)
23) *sc in next st, sc2tog* repeat around (8) Stuff
24) sc2tog around. End off leaving long tail to sew hole closed
ARMS: make 2
1) ch 2. 8 sc in 2nd ch from hook (8)
2) 2 sc in each st around (16)
3) *sc in next 2 sts, 2 sc in next st* repeat around. End with sc in next 2 sts (20)
4) sc in each st around
5) 2 sc in next 4 sts, sc in each st for the rest of the round (24)
6-8) sc in each st around
9) sc2tog, sc2tog, sc2tog, sc2tog, sc in each st for the rest of round (20)
10) sc2tog, sc2tog, sc2tog, sc2tog, sc in each st for the rest of round (16)
11-22) sc in each st around
23) *sc2tog, sc in next 3 sts* repeat around, sc in last st (12)
24) *sc2tog, sc in next 2 sts* repeat around, sc in last st (10)
25) sc2tog around. End off leaving long tail to sew hole closed.

EARS: make 2
1) ch 2, 8 sc in 2nd ch from hook (8)
2) 2 sc in next 5 sts. (13) sl st and end off leaving long tail to sew to head.
MUZZLE:
1) ch 2, 6 sc in 2nd ch from hook (6)
2) 2 sc in each st around (12)
3) 2 sc in each st around (24)
4) sc in each st around. End off leaving long tail to sew onto head. Emboider nose and mouth. Lightly stuff when sewing onto the head.
HEAD:
1) ch 2, 10 sc in 2nd ch from hook (10)
2) 2 sc in each st around (20)
3) *sc in next 3 sts, 2 sc in next st* repeat around (25)
4) *sc in next 3 sts, 2 sc in next st* repeat around, sc in last 2 sts (30)
5-6) sc in each st around
7) *sc in next 4 sts, 2 sc in next st* repeat around (36)
8) *sc in next 4 sts, 2 sc in next st* repeat around, sc in last 2 sts (42)
9-12) sc in each st around
13) *sc in next 4 sts, sc2tog* repeat around (34)
14) *sc in next 3, sc2tog* repeat around, sc in last st (28)
15) sc in each st around
16) *sc in next 2 sts, sc2tog* repeat around (21)
17) *sc in next st, sc2tog* repeat around (14) Attach muzzle and eyes. Stuff.
18) sc2tog around. End off leaving long tail to sew hole closed and to attach to body
Assembly:
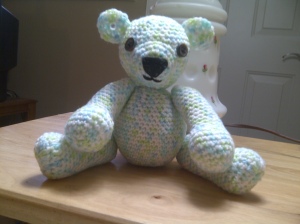
Sew muzzle and ears onto head, then sew the head, arms and legs onto the body
Copyright Amber deGoutiere 2011. This is my own original design. Please do NOT claim this pattern as your own or sell it. However feel free to use for personal use, gifts or charities


very cute pattern
Thanks! 🙂
These are so sweet. Thank you so much. And a very Happy New Year too.
thank you 🙂 Happy New Year to you too
Cant wait to make this for my great grand son he’s going to love it thank you for the pattern hope to start it tomorrow.
Thank you, so glad you like it 🙂
This is a beautiful teddy bear! Thanks for much for sharing. I’ve been looking for a pattern to make by new niece a special toy from me and this is exactly what I’ve been looking for!
Thank you! I am glad you like it 🙂
Hi,
I am the owner of crochetpatternbonanza(.)com, a free crochet pattern directory. Just wanted to let you know that I’m updating my website and wanted to make sure that I have your permission to use your images for linking back to your free crochet patterns and/or tutorials.
You can find more information on this page: http://crochetpatternbonanza.com/submit-your-links.html
Thank you so much for your time and let me know if you have any questions or concerns.
Rhelena